Securing a .NET API C#: API Key, Basic Authentication, and JWT

When developing a .NET API, ensuring secure access control is critical to protect sensitive data and resources. Several methods are available, including API Key Authentication, Basic Authentication, and JSON Web Tokens (JWT). Each has its use case and security implication. This guide explore how to implement these methods in a .NET API.
Sample Payment API
Here is a basic example of a Payment API with CRUD operations:
You can find the full code in this GitHub Repo
    [Route("api/[controller]")]
    [ApiController]
    public class PaymentsController : ControllerBase
    {
        // Get all payments
        [HttpGet]
        public ActionResult<IEnumerable<Payment>> GetPayments()
        {
            var payments = PaymentRepository.GetPayments();
            return Ok(payments);
        }

        // Get a payment by ID
        [HttpGet("{id}")]
        public ActionResult<Payment> GetPayment(int id)
        {
            var payment = PaymentRepository.GetPaymentById(id);
            if (payment == null)
                return NotFound();
            return Ok(payment);
        }

        // Add a new payment
        [HttpPost]
        public ActionResult<Payment> PostPayment([FromBody] Payment payment)
        {
            if (payment == null)
                return BadRequest();

            payment.Id = PaymentRepository.GetPayments().Max(p => p.Id) + 1;  // Auto-increment ID
            PaymentRepository.AddPayment(payment);
            return CreatedAtAction(nameof(GetPayment), new { id = payment.Id }, payment);
        }

        // Update an existing payment
        [HttpPut("{id}")]
        public IActionResult PutPayment(int id, [FromBody] Payment payment)
        {
            if (payment == null)
                return BadRequest();

            PaymentRepository.UpdatePayment(id, payment);
            return NoContent();
        }

        // Delete a payment
        [HttpDelete("{id}")]
        public IActionResult DeletePayment(int id)
        {
            var payment = PaymentRepository.GetPaymentById(id);
            if (payment == null)
                return NotFound();

            PaymentRepository.DeletePayment(id);
            return NoContent();
        }
    }
1. API Key Authentication
API Key Authentication is a simple mechanism where clients send a unique key with their request. The server validates the key to grant access.
Required Package
No additional package is required for API Key Authentication.
Implementation:
- Generate an API Key:
Create a secure and unique key for each client. Store these keys securely in your environment variables or app Settings etc to get it .
{
  "Logging": {
    "LogLevel": {
      "Default": "Information",
      "Microsoft.AspNetCore": "Warning"
    }
  },
  "AllowedHosts": "*",
  "ApiKey": "SuperSecretApiKey12345"
}- Middleware for Validation:
Add middleware to validate the API key in incoming requests.
     public class ApiKeyMiddleware
    {
        private readonly RequestDelegate _next;
        private const string ApiKeyHeaderName = "X-API-KEY";

        public ApiKeyMiddleware(RequestDelegate next)
        {
            _next = next;
        }

        public async Task InvokeAsync(HttpContext context, IConfiguration configuration)
        {
            if (!context.Request.Headers.TryGetValue(ApiKeyHeaderName, out var extractedApiKey))
            {
                context.Response.StatusCode = 401;
                await context.Response.WriteAsync("API Key is missing.");
                return;
            }

            var apiKey = configuration.GetValue<string>("ApiKey");

            if (!apiKey.Equals(extractedApiKey))
            {
                context.Response.StatusCode = 403;
                await context.Response.WriteAsync("Unauthorized client.");
                return;
            }

            await _next(context);
        }
    }

    public static class ApiKeyMiddlewareExtensions
    {
        public static IApplicationBuilder UseApiKeyMiddleware(this IApplicationBuilder builder)
        {
            return builder.UseMiddleware<ApiKeyMiddleware>();
        }
    }
- Register Middleware: In your program.cs file :
app.UseHttpsRedirection();
app.UseAuthorization();
// Use API Key
app.UseApiKeyMiddleware(); //add this
app.MapControllers();js- Swagger Configuration:
To let your clients test the secured API throw Swagger, you should configure it :
// Add Swagger with API Key configuration
builder.Services.AddSwaggerGen(c =>
{
    c.SwaggerDoc("v1", new OpenApiInfo { Title = "Payment API - API Key", Version = "v1" });
    c.AddSecurityDefinition("ApiKey", new OpenApiSecurityScheme
    {
        Name = "X-API-KEY",
        Type = SecuritySchemeType.ApiKey,
        In = ParameterLocation.Header,
        Description = "Enter your API Key in the header."
    });
    c.AddSecurityRequirement(new OpenApiSecurityRequirement
    {
        {
            new OpenApiSecurityScheme
            {
                Reference = new OpenApiReference
                {
                    Type = ReferenceType.SecurityScheme,
                    Id = "ApiKey"
                }
            },
            new string[] { }
        }
    });
});
var app = builder.Build();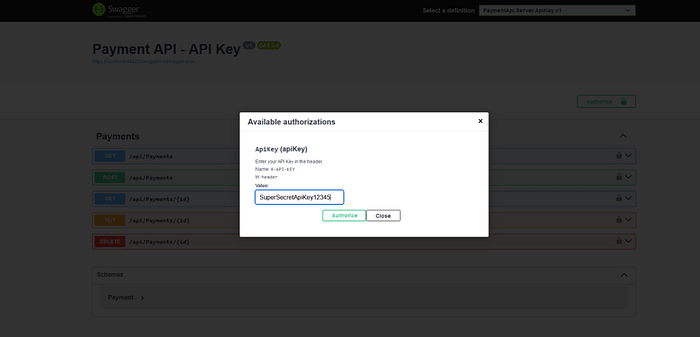
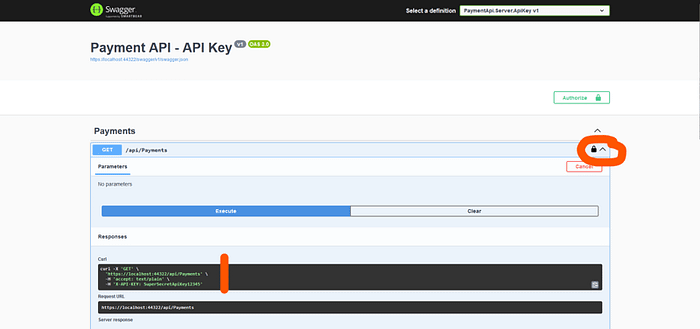
When API key is valid, you will be authorized to use the APIs endpoints else you will get 401 error
2. Basic Authentication
Basic Authentication requires the client to send a username and password in the Authorization header. This method is good for internal APIs or development environment.
Required Package
Install the following NuGet package:
Microsoft.AspNetCore.AuthenticationImplementation:
- Create Authentication Handler:
    public class BasicAuthMiddleware
    {
        private readonly RequestDelegate _next;

        public BasicAuthMiddleware(RequestDelegate next)
        {
            _next = next;
        }

        public async Task InvokeAsync(HttpContext context)
        {
            if (!context.Request.Headers.TryGetValue("Authorization", out var authorizationHeader))
            {
                context.Response.StatusCode = 401;
                context.Response.Headers["WWW-Authenticate"] = "Basic realm=\"PaymentApi\"";
                await context.Response.WriteAsync("Authorization header is missing.");
                return;
            }

            var authHeader = AuthenticationHeaderValue.Parse(authorizationHeader);
            var credentialBytes = Convert.FromBase64String(authHeader.Parameter ?? string.Empty);
            var credentials = Encoding.UTF8.GetString(credentialBytes).Split(':', 2);

            if (credentials.Length != 2 || credentials[0] != "test" || credentials[1] != "test")
            {
                context.Response.StatusCode = 403;
                await context.Response.WriteAsync("Invalid username or password.");
                return;
            }

            await _next(context);
        }
    }

    public static class BasicAuthMiddlewareExtensions
    {
        public static IApplicationBuilder UseBasicAuthMiddleware(this IApplicationBuilder builder)
        {
            return builder.UseMiddleware<BasicAuthMiddleware>();
        }
}- Apply Authentication: In program.cs :
app.UseHttpsRedirection();
app.UseAuthorization();
//Use Basic Auth Middleware
app.UseBasicAuthMiddleware();
app.MapControllers();
app.Run();- Swagger Configuration:
// Add Swagger with Basic Authentication configuration
builder.Services.AddSwaggerGen(c =>
{
    c.SwaggerDoc("v1", new OpenApiInfo { Title = "Payment API - Basic Auth", Version = "v1" });
    c.AddSecurityDefinition("Basic", new OpenApiSecurityScheme
    {
        Name = "Authorization",
        Type = SecuritySchemeType.Http,
        Scheme = "basic",
        In = ParameterLocation.Header,
        Description = "Enter your username and password as Base64 encoded value in the format 'username:password'."
    });
    c.AddSecurityRequirement(new OpenApiSecurityRequirement
    {
        {
            new OpenApiSecurityScheme
            {
                Reference = new OpenApiReference
                {
                    Type = ReferenceType.SecurityScheme,
                    Id = "Basic"
                }
            },
            new string[] { }
        }
    });
});


var app = builder.Build();c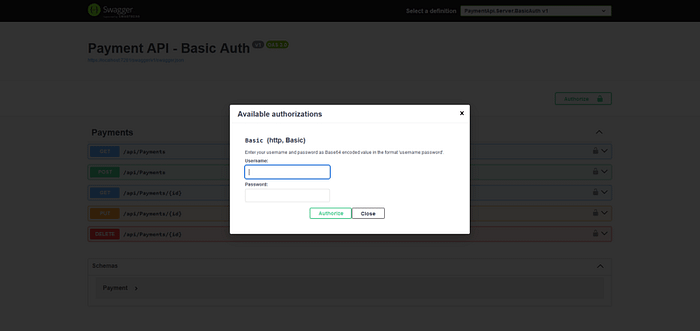
Note that you should change the way how to handle the login process ( secure password etc..)
3. JWT Authentication
JWT (JSON Web Token) is a widely-used method for securing APIs. It provide a compact and self-contained token format that includes user claims and is signed for integrity.
Required Package
Install the following NuGet package:
Microsoft.AspNetCore.Authentication.JwtBearerImplementation:
- Add Authentication Controller : In this controller , we handle the way how users login and we generate tokens for them.
    [ApiController]
    [Route("api/[controller]")]
    public class AuthController : ControllerBase
    {
        private readonly IConfiguration _configuration;

        public AuthController(IConfiguration configuration)
        {
            _configuration = configuration;
        }

        [HttpPost("login")]
        public IActionResult Login([FromBody] LoginRequest login)
        {
            // Validate user credentials (hardcoded for example purposes)
            if (login.Username != "test" || login.Password != "test")
                return Unauthorized("Invalid username or password");

            // Generate the JWT token
            var token = GenerateJwtToken(login.Username);

            return Ok(new { Token = token });
        }

        private string GenerateJwtToken(string username)
        {
            var jwtSettings = _configuration.GetSection("Jwt");

            var claims = new[]
            {
            new Claim(JwtRegisteredClaimNames.Sub, username),
            new Claim(JwtRegisteredClaimNames.Jti, Guid.NewGuid().ToString()),
            new Claim(ClaimTypes.Role, "Admin")
        };

            var key = new SymmetricSecurityKey(Encoding.UTF8.GetBytes(jwtSettings["Key"]));
            var creds = new SigningCredentials(key, SecurityAlgorithms.HmacSha256);

            var token = new JwtSecurityToken(
                issuer: jwtSettings["Issuer"],
                audience: jwtSettings["Audience"],
                claims: claims,
                expires: DateTime.UtcNow.AddHours(1),
                signingCredentials: creds);

            return new JwtSecurityTokenHandler().WriteToken(token);
        }
    }

    public class LoginRequest
    {
        public string Username { get; set; }
        public string Password { get; set; }
}- Add Authentication Service: In program.cs , we configure the authentication service for our application :
var builder = WebApplication.CreateBuilder(args);

var jwtSettings = builder.Configuration.GetSection("Jwt");
var key = Encoding.UTF8.GetBytes(jwtSettings["Key"]);

builder.Services.AddAuthentication(options =>
{
    options.DefaultAuthenticateScheme = JwtBearerDefaults.AuthenticationScheme;
    options.DefaultChallengeScheme = JwtBearerDefaults.AuthenticationScheme;
}).AddJwtBearer(options =>
{
    options.TokenValidationParameters = new TokenValidationParameters
    {
        ValidateIssuer = true,
        ValidateAudience = true,
        ValidateLifetime = true,
        ValidateIssuerSigningKey = true,
        ValidIssuer = jwtSettings["Issuer"],
        ValidAudience = jwtSettings["Audience"],
        IssuerSigningKey = new SymmetricSecurityKey(key)
    };
});
// Add services to the container.

builder.Services.AddControllers();
builder.Services.AddEndpointsApiExplorer();
- Apply Authentication: Let’s apply the authentication now in program.cs:
app.UseHttpsRedirection();
// Add Authentication
app.UseAuthentication();
app.UseAuthorization(); //<--
app.MapControllers();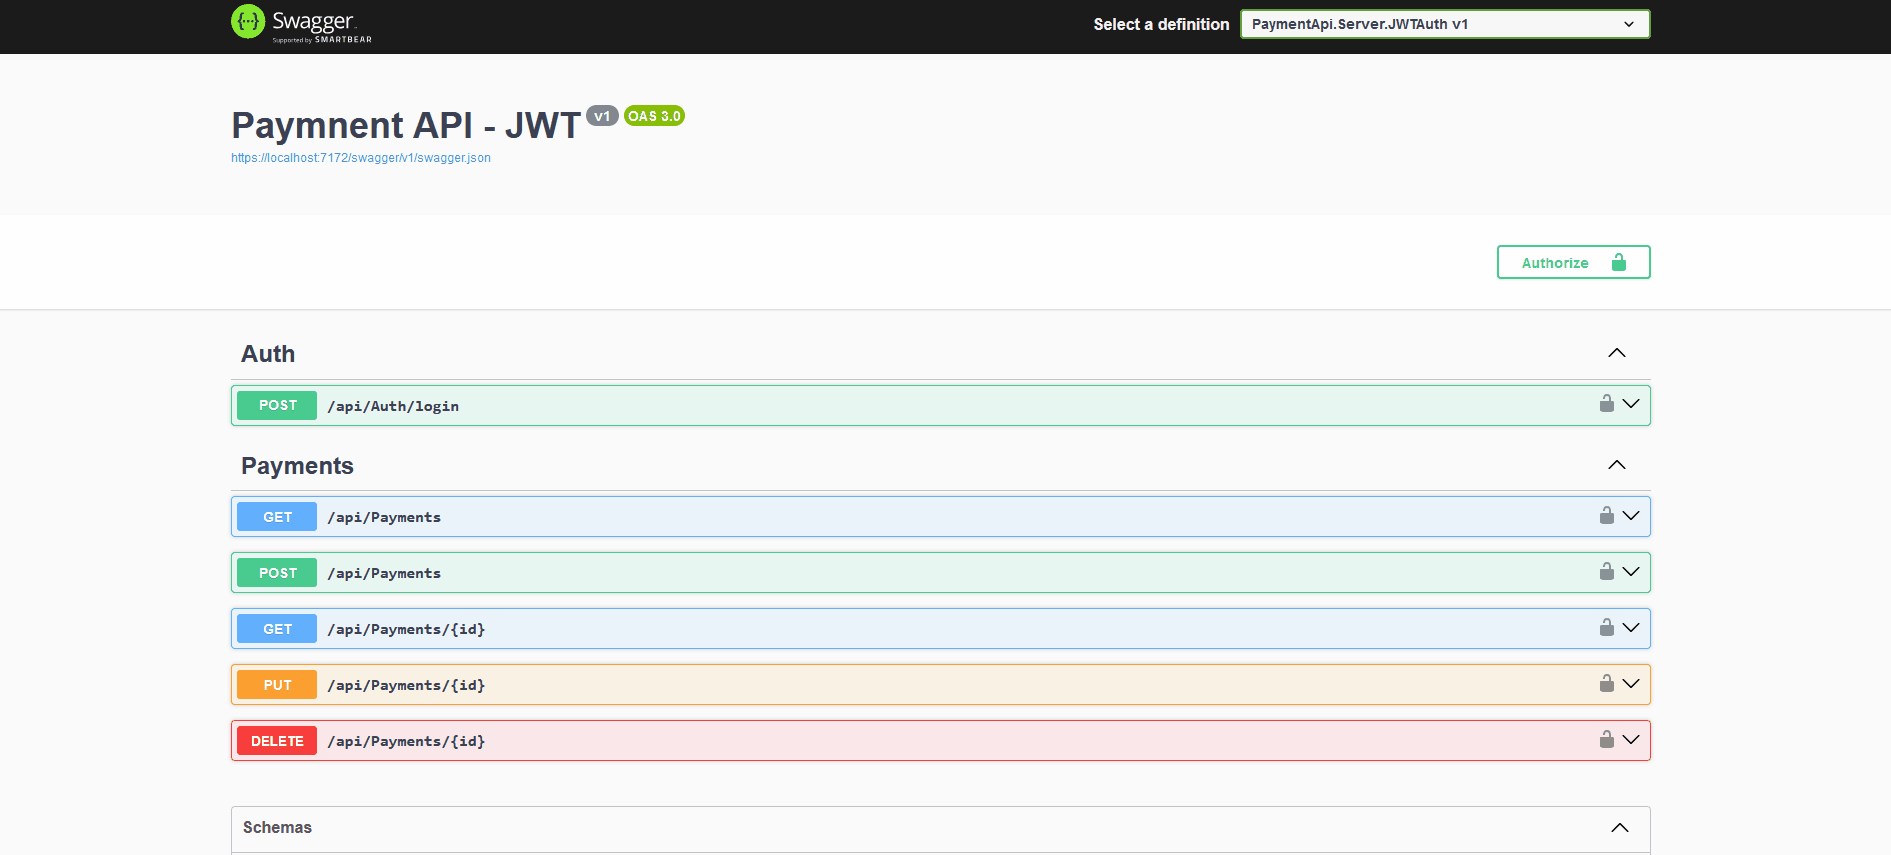
app.Run();- Swagger Configuration : Let’s configure our swagger so it shows the Authorize button using Jwt
/ Add Swagger with JWT configuration
builder.Services.AddSwaggerGen(c =>
{
    c.SwaggerDoc("v1", new OpenApiInfo { Title = "Paymnent API - JWT", Version = "v1" });
    c.AddSecurityDefinition("Bearer", new OpenApiSecurityScheme
    {
        Name = "Authorization",
        Type = SecuritySchemeType.Http,
        Scheme = "Bearer",
        BearerFormat = "JWT",
        In = ParameterLocation.Header,
        Description = "Enter 'Bearer' [space] and then your valid token."
    });
    c.AddSecurityRequirement(new OpenApiSecurityRequirement
    {
        {
            new OpenApiSecurityScheme
            {
                Reference = new OpenApiReference
                {
                    Type = ReferenceType.SecurityScheme,
                    Id = "Bearer"
                }
            },
            new string[] { }
        }
    });
});

var app = builder.Build();cs
In appsettings.json we add the necessaries information:
 "Jwt": {
    "Key": "SuperSecretKey12345SuperSecretKey12345SuperSecretKey12345SuperSecretKey12345",
    "Issuer": "SecureApiJwt",
    "Audience": "ApiUsers",
    "ExpiryMinutes": 60
  }
Don’t forget to add [Authorize] in you controllers
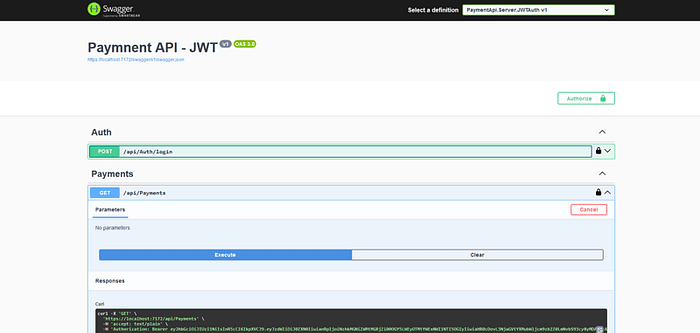
To test now , you should Login , you will get a token . In authorize button , you should add the generated token to access to the endpoints
Conclusion
Securing your .NET API is essential to ensure the integrity and confidentiality of the data it processes.
You can find the full code in my GitHub repo